People vector created by stories – www.freepik.com
Leads are the lifeblood of both B2B and B2C businesses. While you can try selling to strangers, converting a prospect who has warmed up to your brand is often far easier.
But how can you do so using Facebook Ads? What are the steps needed to effectively launch a Facebook Lead Generation Campaign?
In this article, I will be providing a systematic step-by-step guide on how you can launch your first lead generation campaign using Facebook Ad Manager.
The methods you learn here applies to any business that needs leads, but they’ll be especially effective if your clients are either consumers, Small and Medium sized Enterprises (SMEs), entrepreneurs, and solopreneurs.
Ready to get some leads? Here are the 10 steps you need to take to successfully launch Facebook lead gen ads.
#1 Know Your Audience
Before you can attract leads to your Facebook ad, you need to understand who your prospect is.
Here, it helps to paint a detailed customer profile, and more importantly, to create a hook that will entice them to click on your ad.
What are examples of these hooks?
- Have: What will your customer have if they take up your offer? This would be your lead magnet (more later).
- Feel: How will your customer feel when they respond to your offer? Probably more confident, better prepared, or fitter and smarter?
- Average Day: How will their average day change once they respond to your offer?
- Status: Are there any changes in their status? For instance, they may be equipped with new knowledge and skills to grow their business multi-fold.
- Pain to Gain: What will your offer do to solve their pain points?
- Transformation: Is there any transformative power in your offer? How will it change the game for them?
- Irresistible Offer: Can you take away any of the risks involved? For example, by offering a guarantee? Or better yet, make it free without any credit card?
- Speed and Automation: Are there any quick gains that you can offer? How soon can they see results?
Bear in mind that these hooks form the bait that you’ll dangle to attract people to click on your ad.
#2 Create Your Lead Magnet
In the old outbound marketing days, leads are generated by telemarketers making cold calls. Or they could be name cards that you’ve collected from a trade-show.
With the advent of online channels, lead generation typically comes with the trifecta of lead gen campaigns:
- Offer an attractive gift to your prospect—this is your lead magnet
- Ask the prospect to fill in their particulars—what we call an opt-in form—on a landing page
- Promote this offer through an online ad
When we look at the range of lead magnets, they vary in complexity and type. This depends on what’s acceptable in your industry and includes:
- eBooks, Guides, or Physical Books
- Webinars
- Email mini-courses
- Video tutorials
- Samples of products
- Physical Events
- Diagnostic Tools
- Checklists or Templates
- Free consultations
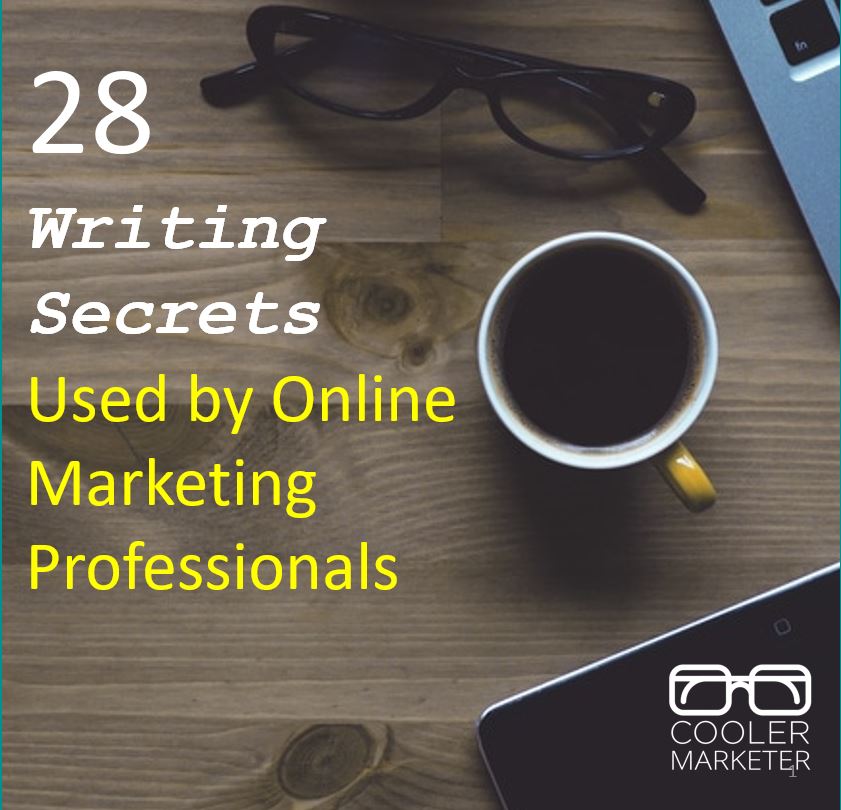
For the campaign that we launched, we developed a 23 page eBook offering online writing secrets as shown below.
#3 Choose Facebook Lead Generation Campaign
Next, you’ll need to log into Facebook Ads Manager to do your Facebook Lead Generation Campaign.
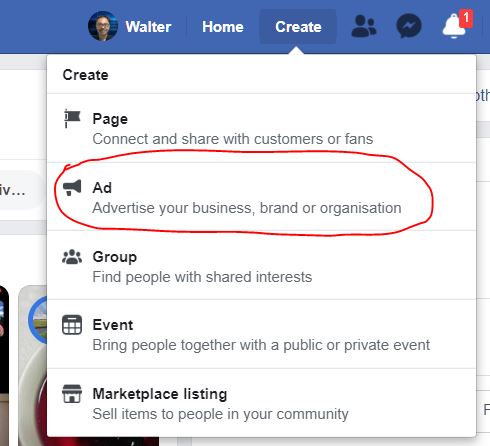
Go into https://facebook.com/ads/manager or click on “Create –> Ad” as shown below.
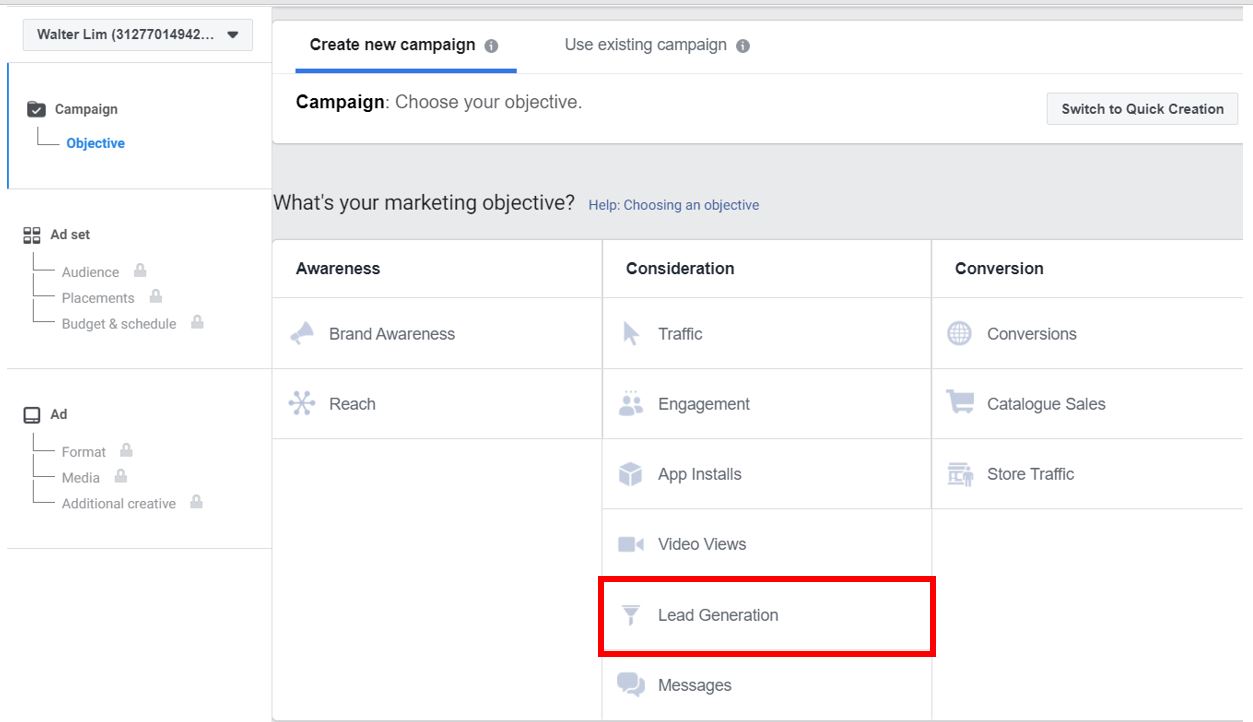
This will bring you to the ad creation tool of Facebook Ads Manager. Choose the “Lead Generation” campaign objective under “Consideration” as shown here.
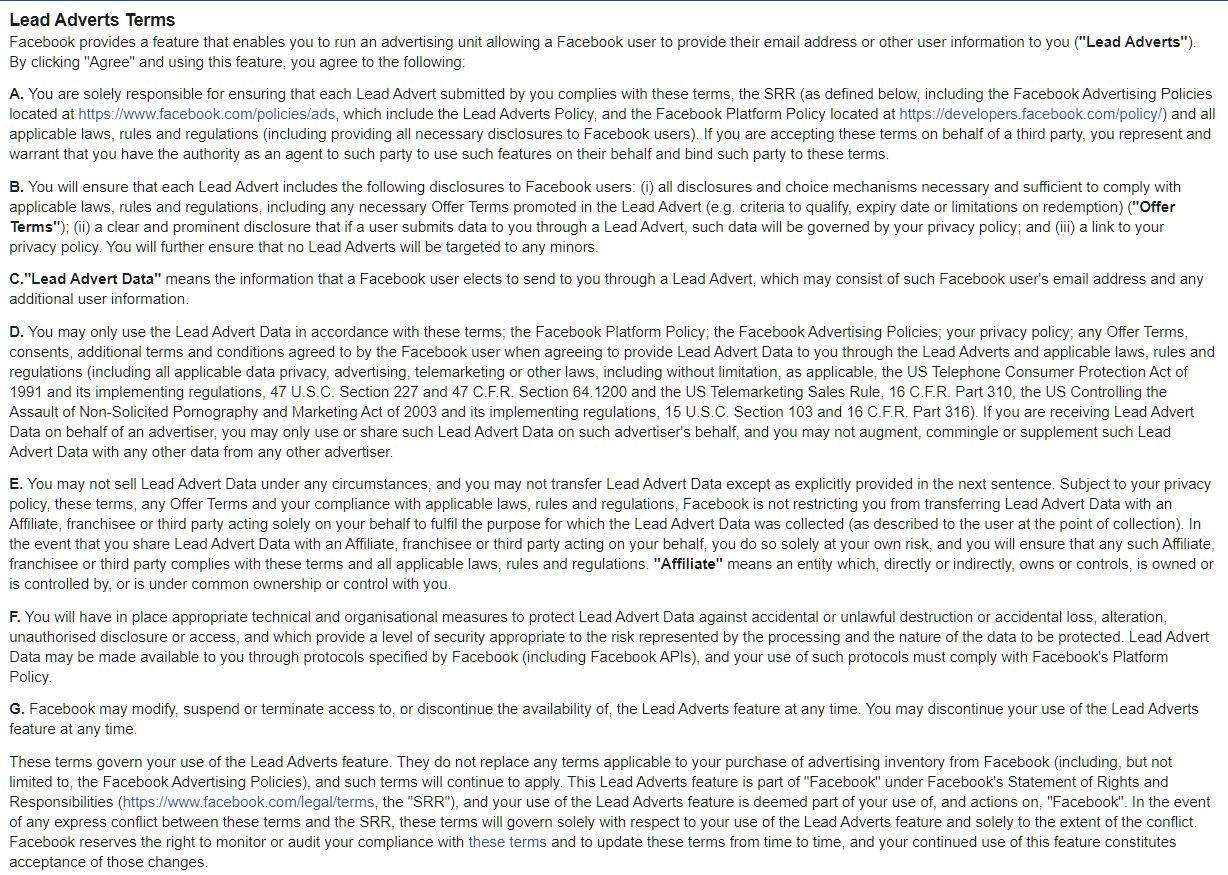
As part of the ad creation process, you’ll need to agree with Facebook’s Lead Ads terms.
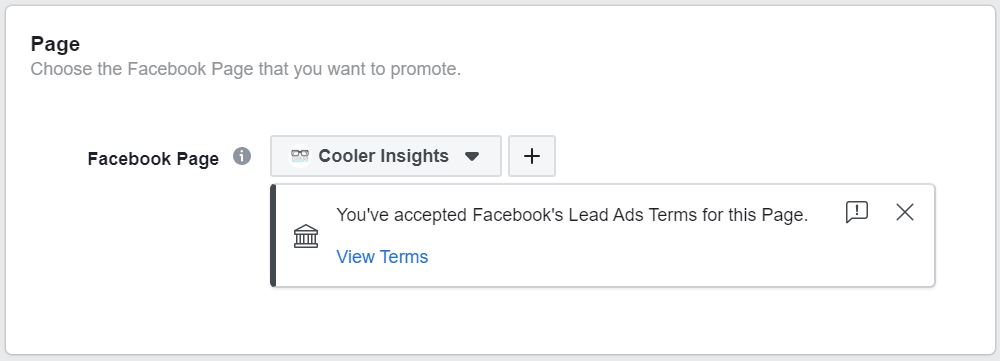
There is quite a lot of legalese in there, but the main thing is to be honest, transparent and open about what you’re doing with the leads. It also protects Facebook from errant users—we certainly don’t want any Cambridge Analytica data scandals!
#4 Set the Right Audiences
The next step you need to do is to choose the right audiences. As leads are considered warm audiences, it makes sense for you to target people who are more likely to convert on your leads.
A good way to do this is to create Custom Audiences of people from different sources, followed by Lookalike Audiences.
First, Create Your Custom Audiences
Go to “Create new audience” and under the “Custom Audiences” window, choose “Create new” followed by “Custom Audience.”
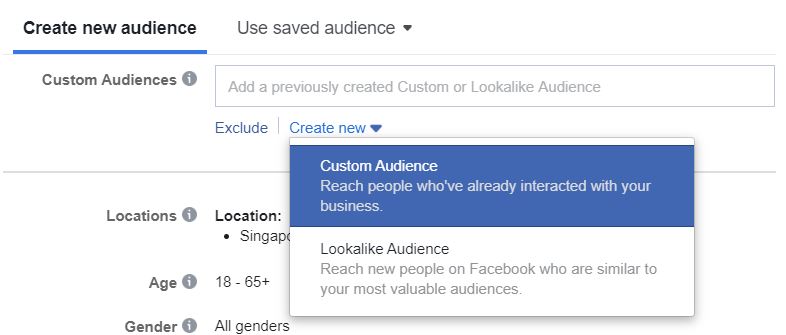
Next, follow the steps to choose the preferred Custom Audience of your choice. Depending on your set-up, they may be Website visitors (you’ll need to install a Facebook Pixel on your website to achieve this), Customer list (you need to set up your Business Manager to use this function), as well as various other sources including Facebook sources.
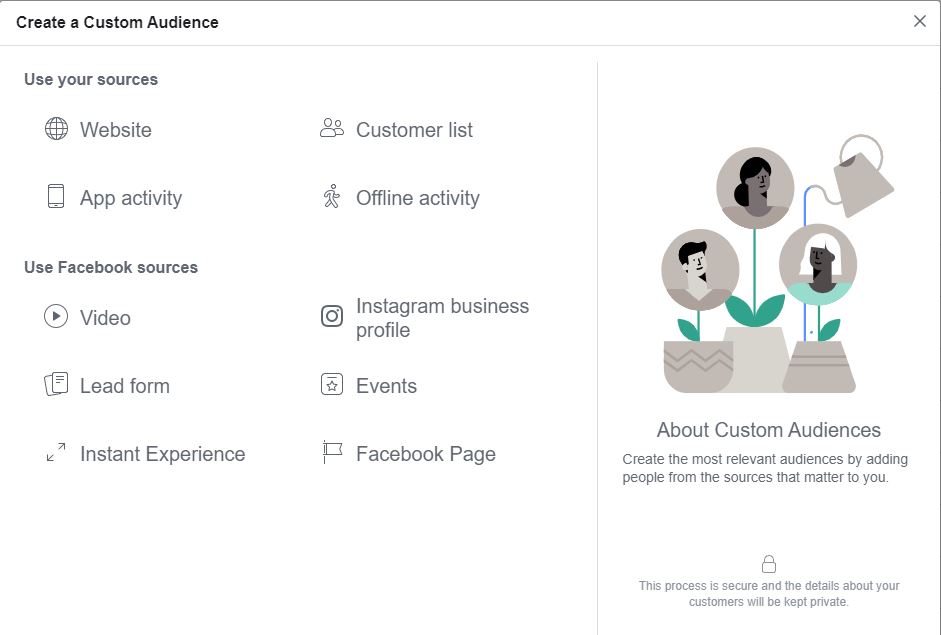
Once you’ve created your Custom Audiences, they should appear on your “Custom Audience” window when you click on it in future.

Next, Create Your Lookalike Audiences
From your Custom Audience, you should create a Lookalike Audience. Facebook’s algorithm will then choose people who are most like the “seed” Custom Audience which you choose, based on their similarity.
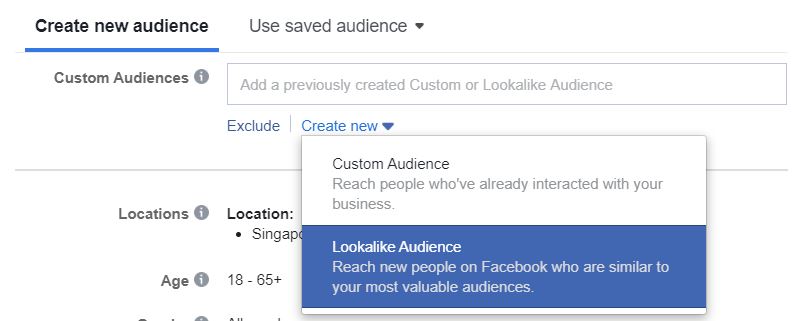
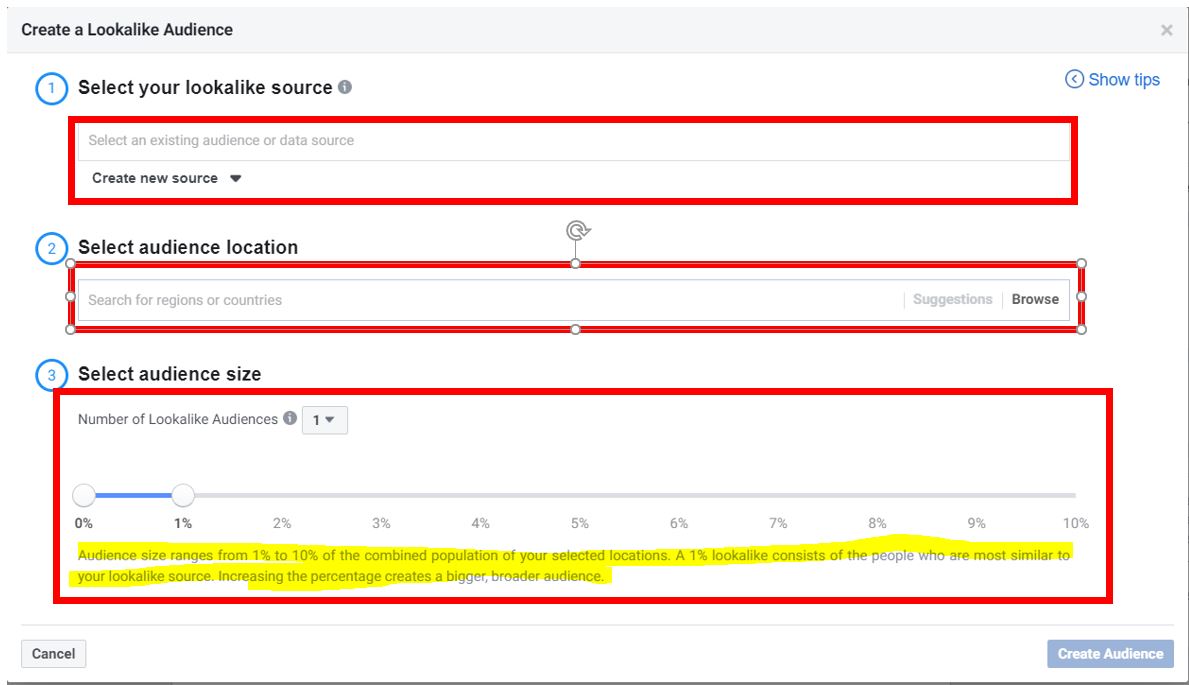
Once you’ve selected this option, various fields for Lookalike Audience emerges. The areas to consider are:
- Your “seed” source of audience to build a Lookalike Audience from. This could either be your fans on your page, or various Custom Audiences.
- The location of your audience
- The similarity to your seed audience and the size of the audience you want. Generally speaking, I’ll try to aim for a size of at least 100,000 to 200,000 or more.
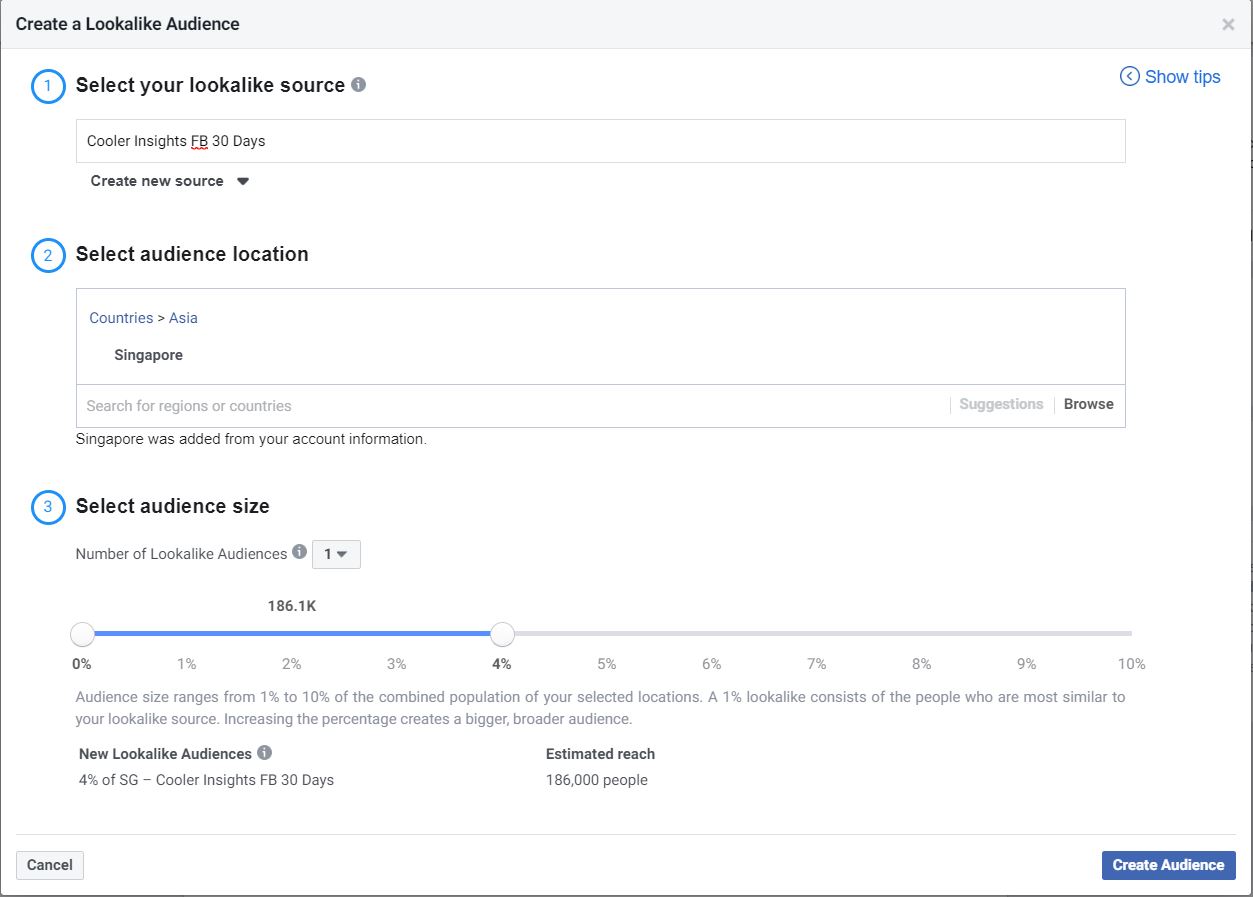
Here’s an example of a Lookalike Audience which I’ve created and used for my lead ads.
After you’ve done so, you should have a few different Custom and Lookalike Audiences that you can use for targeting.
#5 Craft Your Lead Ad
The next thing to consider is how you should craft your lead ad itself. There are various elements to consider here.
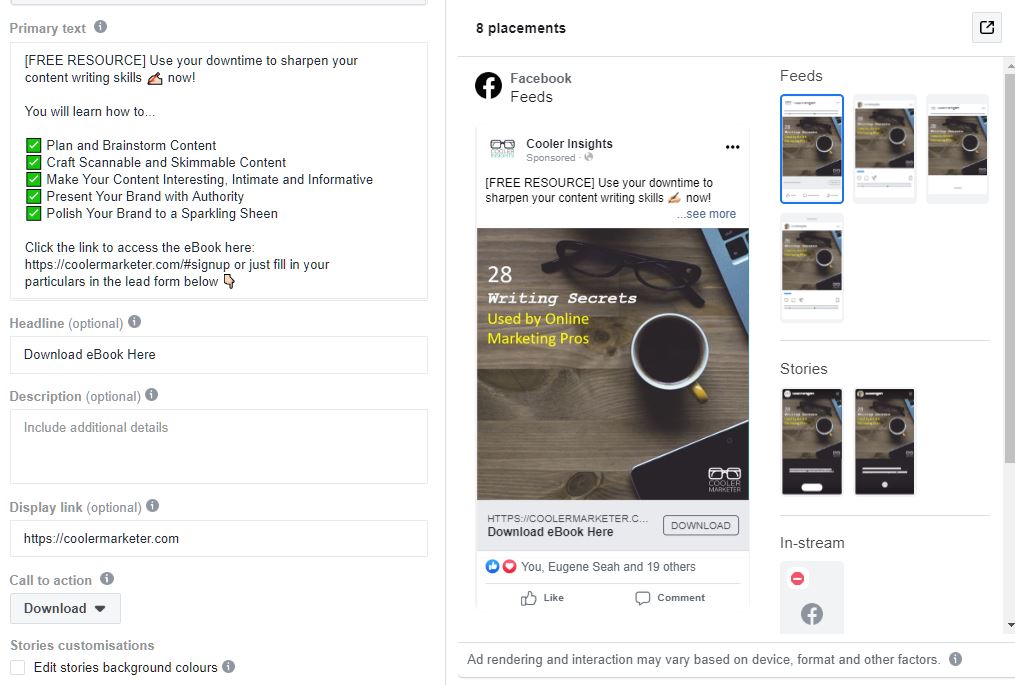
- Image or Video: Make sure that your visual is attractive and entices people to respond to your lead magnet/ offer
- Primary text: Craft compelling copy that immediately grabs your audience’s attention and gets them to take action. Make it clear what USPs your lead magnet provides.
- Headline/ Description: If you wish, you can customise this to have an impactful message
- Call to action: You can change this according to how you’d like your leads to respond
#6 Create Your Lead Form
Immediately after coming up with your copy and image or video, you’ll be asked to create a form. This can be seen in the image below.
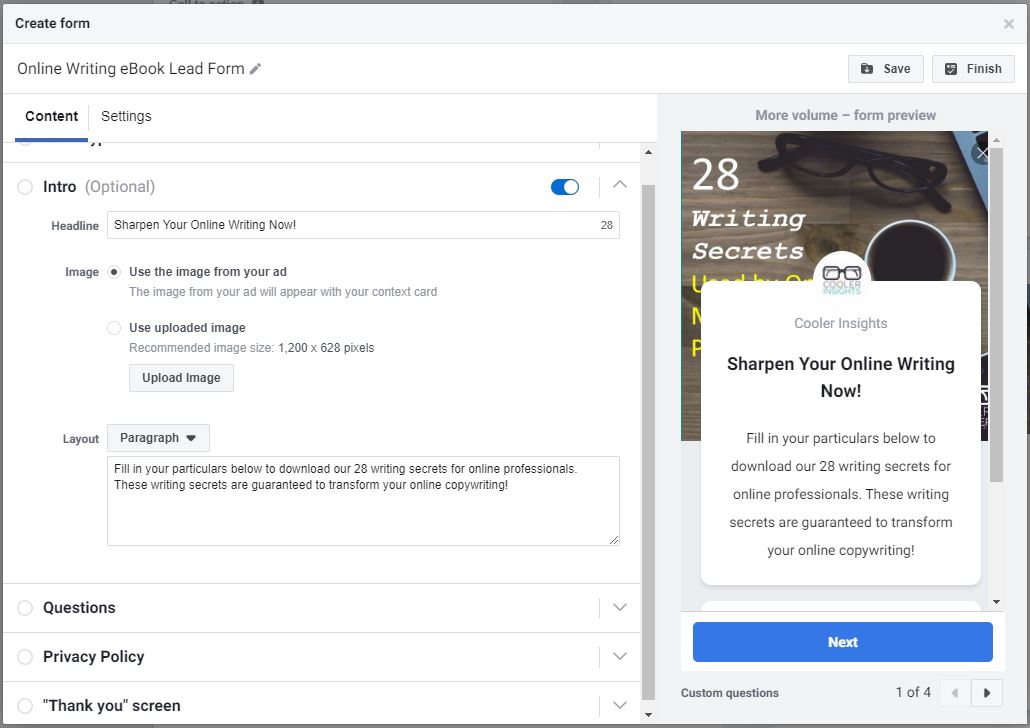
There are various things to consider here:
- Form Type: Do you want people to confirm before they submit their info to you? While this could lead to better leads, it may reduce your volume
- Intro: You can customise a headline and some body copy in your form if you wish. This helps to improve conversions if they assure your prospects on what they’ll get.
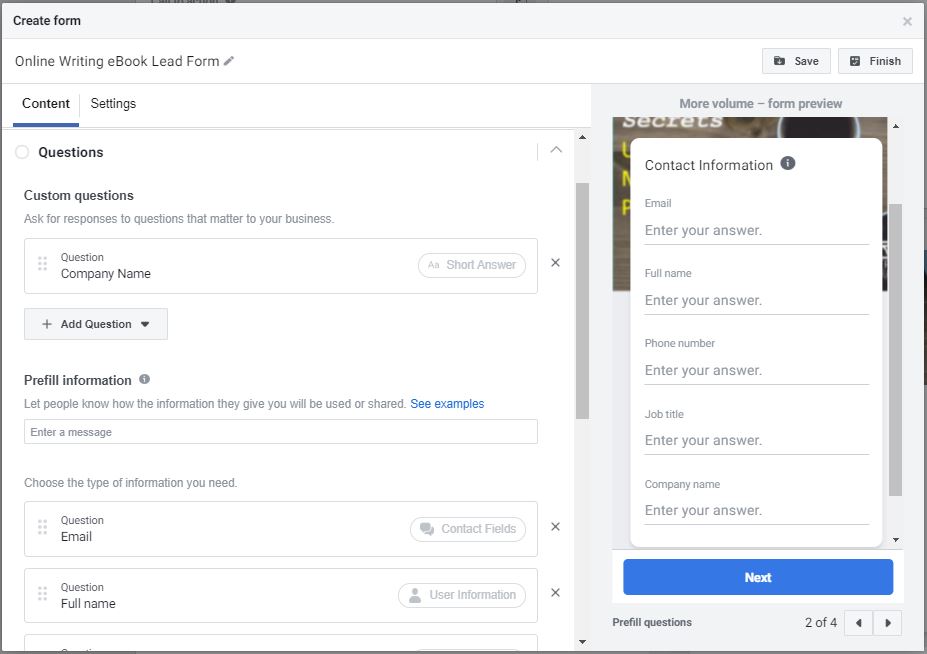
- Questions: These are the fields that you’d like to capture. The default would be the name and email address which Facebook auto-fills, but you can add on more custom questions if you wish. Personally, I find that doing so helps to weed out less interested leads.
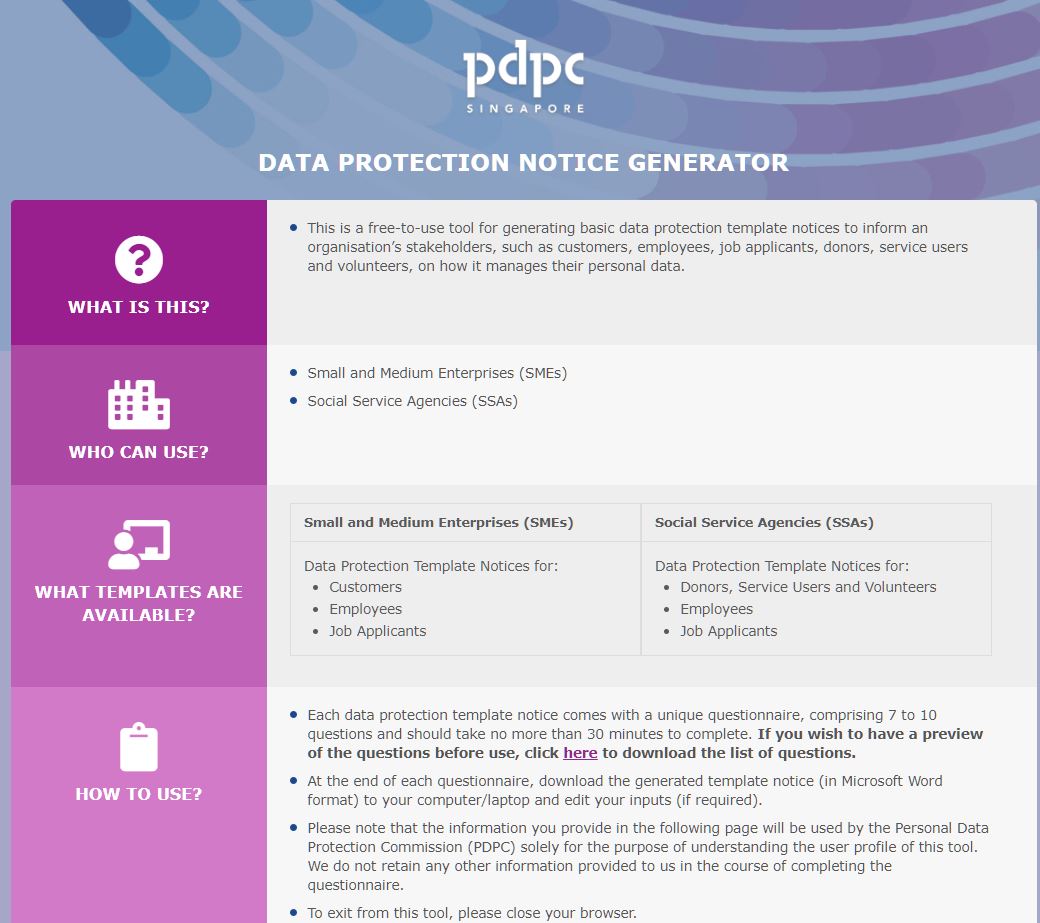
- Privacy Policy: This is a must, and it helps if you already have a privacy policy on your website. If you need help to craft a privacy policy (and can’t afford a lawyer), consider using this nifty Data Protection Notice Generator from the PDPC in Singapore!
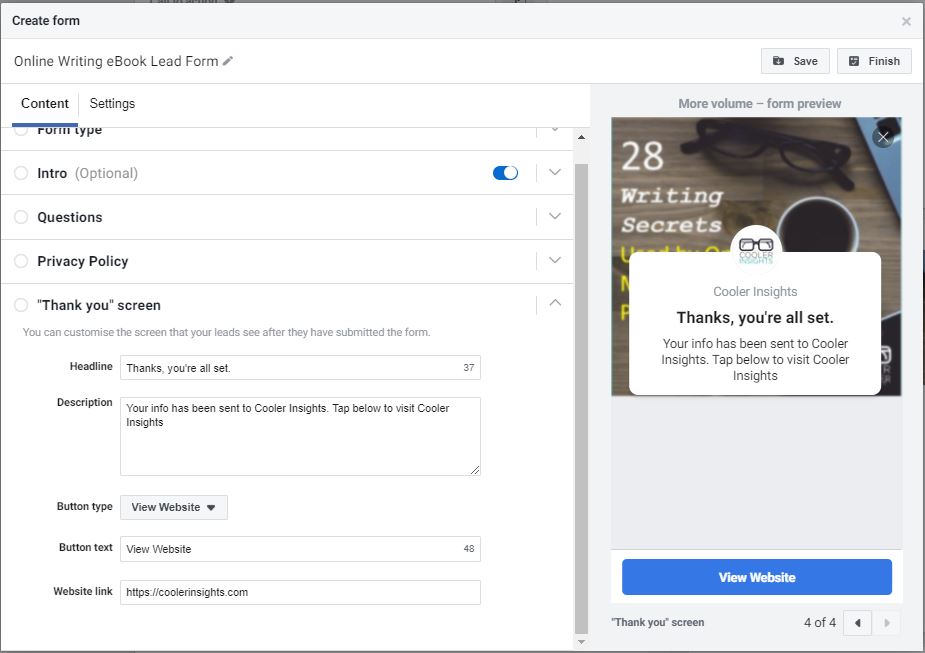
- “Thank You” Screen: This is the final step that your prospects will see. It may be useful to direct them to your website so that they can read more about you here.
#7 Launch Your Lead Ad!
After you’ve gone through the laborious step of creating your Facebook Lead Ad, you can now set it free.
In terms of timeframe and budgets, I find that it may be useful to experiment with a one-month duration for your first lead ad, and to set a budget of between $150 to $200 or so. This will be sufficient to gain some traction with your target audiences.
#8 Monitor Your Facebook Ads Manager Performance
When you’ve run your ads for a day or two, leads will start to be collected. You can then log into your Facebook Ads Manager to monitor your performance.
Under the “Ads” section of your Facebook Ads Manager, you can gauge the performance of your lead ads as shown below.

If you click on the “Results” section where they show “On Facebook leads”, it brings you a Download Leads pop-up where you can either visit the leads centre on your page, Download new leads (in CLV format) or Download by date range.
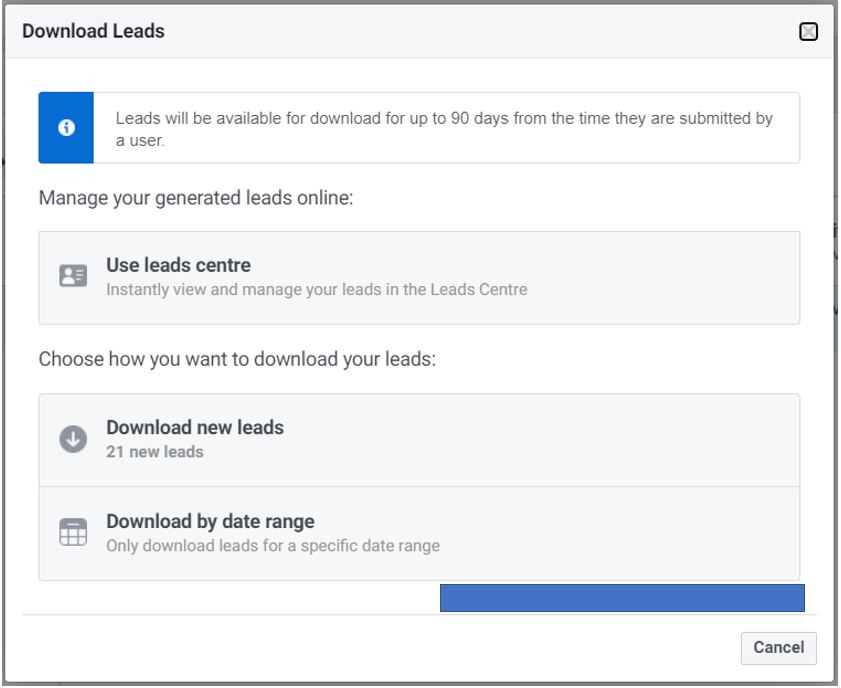
If you wish, you can download your leads progressively as you go along, sending them an email, or you can also do it batch by batch.
#9 Collect, Process and Nurture Your Leads
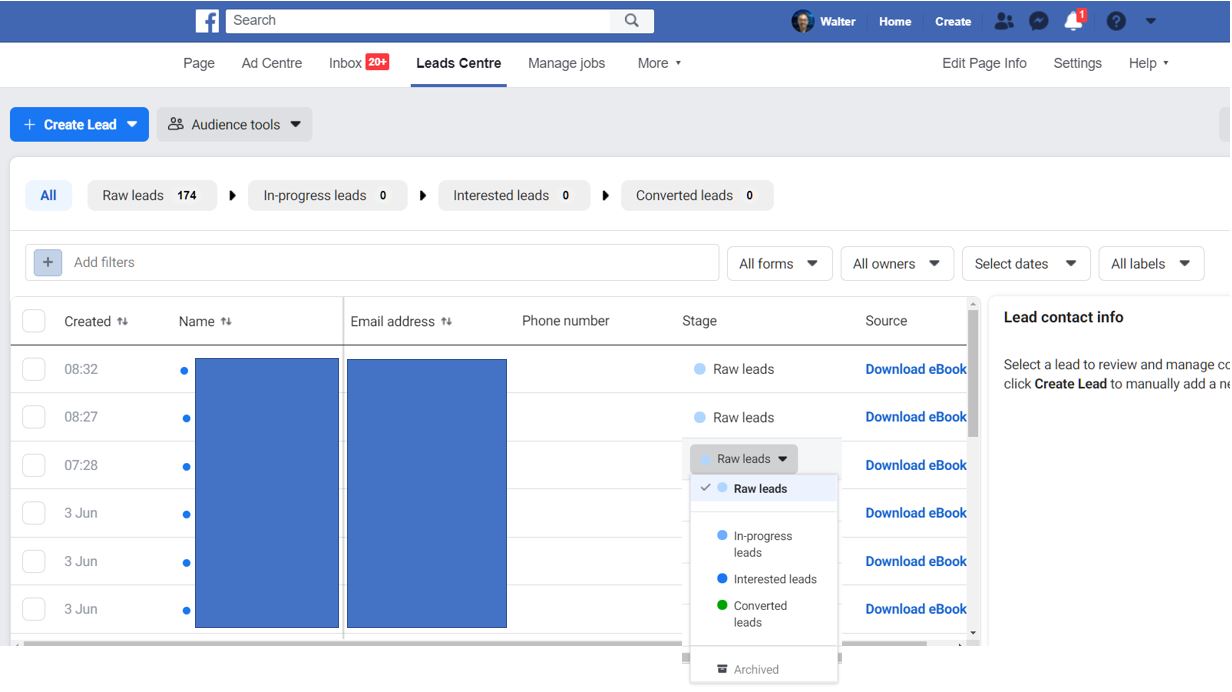
To collect and process your leads, you can visit the “Leads Centre” tab on your Facebook Page. This will only appear when you start running Lead Generation Facebook Ads.
Using the leads centre function on your Facebook Page, you can consider individually following up with each lead and then categorise and label them accordingly. Facebook offers four different stages along the funnel: In-progress leads, Interested leads, and Converted leads.
How should you nurture your leads? Read this comprehensive article on B2B Lead Generation which gives you a deeper insight on how you can do so. Do also look out for my next article where I’ll be exploring email sequencing for lead nurturing.
Conclusion
As a tool for generating leads, Facebook Lead Generation Ads offers a convenient and easy way to do so without the fuss of creating landing pages.
While you’re likely to attract numerous leads (at a fairly low cost per lead) using Facebook Lead Ads, do note that you’ll need a process of qualifying these raw leads and to nurture them through your funnel. Put them into your email sequencing process, and once they’re fairly warmed up, you can consider sending them a sales offer or a deal.
Have you tried Facebook Lead Gen ads? How have your experience been like?

Informative Post. Thank you for sharing such a great blog. It’s really useful for us. Keep sharing.